How to Install Metal Edging: A Comprehensive Guide
Metal edging provides a clean, professional finish to gardens, walkways, and driveways. It’s durable, weather-resistant, and offers a crisp, defined border that enhances the overall aesthetic of your outdoor space. If you’re looking to upgrade your landscaping, learning how to install metal edging is a worthwhile skill. This comprehensive guide will walk you through the process step-by-step, ensuring a successful and visually appealing result. We’ll cover everything from selecting the right type of metal edging to preparing the ground and securing it in place. Whether you’re a seasoned DIY enthusiast or a beginner, this guide provides the knowledge and confidence you need to install metal edging like a pro.
Why Choose Metal Edging?
Before diving into the installation process, let’s consider why metal edging is a superior choice compared to other edging materials like plastic or wood. The benefits are numerous:
- Durability: Metal, particularly steel or aluminum, withstands harsh weather conditions and resists damage from lawnmowers and foot traffic.
- Longevity: Unlike wood, metal edging won’t rot or decay. It offers a long-lasting solution for defining your landscape.
- Clean Aesthetics: Metal provides a sleek, modern look that complements various architectural styles.
- Flexibility: Metal edging can be easily bent and shaped to create curves and intricate designs.
- Minimal Maintenance: Once installed, metal edging requires very little maintenance.
Types of Metal Edging
Several types of metal edging are available, each with its own characteristics and applications. Understanding the differences will help you choose the best option for your project:
- Steel Edging: A popular choice due to its strength and affordability. Steel metal edging is often powder-coated for added protection against rust.
- Aluminum Edging: Lightweight and corrosion-resistant, aluminum metal edging is ideal for coastal areas or environments with high humidity.
- Corten Steel Edging: Also known as weathering steel, Corten steel develops a distinctive rust-like patina over time, adding a unique aesthetic appeal.
- Stainless Steel Edging: The most durable and corrosion-resistant option, stainless steel metal edging is suitable for demanding environments.
Tools and Materials You’ll Need
Before you begin the installation, gather the necessary tools and materials:
- Metal Edging: Purchase the appropriate length and type of metal edging for your project.
- Stakes: These are used to secure the metal edging in place. Choose stakes that are compatible with your chosen edging type.
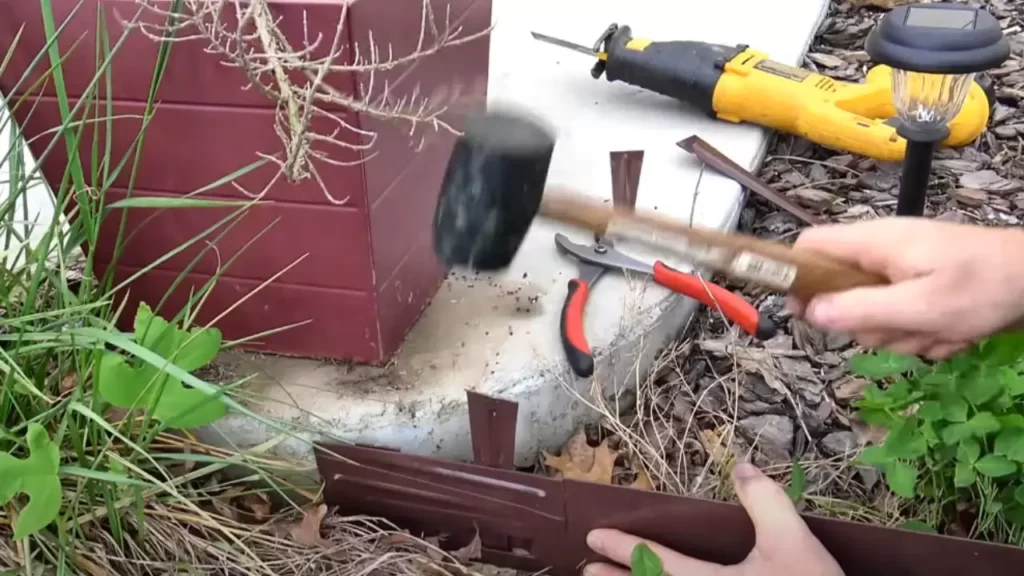
- Hammer or Mallet: For driving the stakes into the ground. A rubber mallet is preferred to avoid damaging the metal edging.
- Shovel or Spade: For digging a trench along the desired border.
- Measuring Tape: To accurately measure the area and ensure proper spacing.
- Gloves: To protect your hands during the installation process.
- Safety Glasses: To protect your eyes from debris.
- Level: To ensure the metal edging is installed at the correct height.
- Utility Knife or Heavy-Duty Scissors: For cutting the metal edging to the desired length, if necessary.
- Landscape Fabric (Optional): To prevent weed growth along the border.
- Sand or Gravel (Optional): For leveling the base of the trench.
Step-by-Step Installation Guide
Now that you have the tools and materials, let’s proceed with the installation process:
Step 1: Planning and Layout
Begin by planning the layout of your metal edging. Use a measuring tape to mark the desired border, ensuring accurate measurements and smooth curves. Consider the overall design and how the metal edging will integrate with your existing landscape. Clear any debris, rocks, or vegetation from the area.
Step 2: Digging the Trench
Using a shovel or spade, dig a trench along the marked border. The depth of the trench should be slightly less than the height of the metal edging, allowing the top edge to protrude slightly above the ground. The width of the trench should be sufficient to accommodate the metal edging and any backfill material.
Step 3: Preparing the Base
For optimal results, prepare the base of the trench by leveling it with sand or gravel. This will provide a stable foundation for the metal edging and prevent it from shifting over time. If you’re using landscape fabric, lay it down at the bottom of the trench before adding the sand or gravel. This helps to suppress weed growth and maintain a clean border.
Step 4: Installing the Metal Edging
Carefully position the metal edging in the trench, ensuring it follows the planned layout. Overlap the sections of metal edging slightly to create a seamless connection. Use a level to ensure the metal edging is installed at the correct height and is level along its length. If you need to cut the metal edging to fit, use a utility knife or heavy-duty scissors. [See also: Choosing the Right Landscape Edging Material]
Step 5: Securing the Metal Edging
Once the metal edging is in place, secure it using stakes. Drive the stakes into the ground along the inside edge of the metal edging, spacing them evenly apart. Use a hammer or mallet to drive the stakes in firmly, ensuring they are flush with the top of the metal edging. The number of stakes required will depend on the type of metal edging and the soil conditions. For curved sections, use more stakes to maintain the desired shape.
Step 6: Backfilling and Finishing
Backfill the trench with soil, packing it firmly around the metal edging. Remove any excess soil and smooth the surface. Water the area thoroughly to settle the soil and ensure proper drainage. Inspect the metal edging for any imperfections and make any necessary adjustments. Add mulch, gravel, or other decorative materials to complete the landscaping.
Tips for Success
Here are some additional tips to ensure a successful metal edging installation:
- Choose the Right Metal: Select a metal that is appropriate for your climate and soil conditions.
- Proper Planning: Take the time to plan your layout carefully, considering the overall design and functionality of your landscape.
- Accurate Measurements: Ensure accurate measurements to avoid gaps or inconsistencies in the metal edging.
- Secure Installation: Use enough stakes to secure the metal edging firmly in place, especially in areas with heavy foot traffic or unstable soil.
- Regular Maintenance: Inspect the metal edging periodically and make any necessary repairs or adjustments.
Troubleshooting Common Issues
Even with careful planning and execution, you may encounter some common issues during the metal edging installation process. Here are some troubleshooting tips:
- Edging Won’t Stay in Place: This is usually due to insufficient staking or unstable soil. Use more stakes and consider adding a layer of gravel to the base of the trench.
- Edging is Uneven: Use a level to ensure the metal edging is installed at the correct height and is level along its length. Adjust the soil or gravel base as needed.
- Gaps Between Sections: Overlap the sections of metal edging slightly to create a seamless connection. Use a utility knife or heavy-duty scissors to trim any excess material.
- Rust or Corrosion: Choose a metal that is resistant to rust and corrosion. Apply a protective coating or sealant to extend the life of the metal edging.
Maintaining Your Metal Edging
Once your metal edging is installed, proper maintenance will help to keep it looking its best for years to come. Here are some simple maintenance tips:
- Regular Cleaning: Clean the metal edging regularly with a mild soap and water solution to remove dirt, debris, and stains.
- Rust Prevention: Apply a rust inhibitor or sealant to prevent rust and corrosion, especially in areas with high humidity or salt exposure.
- Weed Control: Remove weeds that grow along the border to maintain a clean and tidy appearance.
- Repair Damage: Repair any damage to the metal edging promptly to prevent further deterioration.
Conclusion
Installing metal edging is a relatively straightforward DIY project that can significantly enhance the look and functionality of your landscape. By following these steps and tips, you can achieve a professional-looking result that will last for years to come. From selecting the right type of metal edging to preparing the ground and securing it in place, this comprehensive guide has provided you with the knowledge and confidence you need to tackle this project successfully. So, grab your tools, put on your gloves, and get ready to transform your outdoor space with beautiful and durable metal edging. [See also: Metal Edging vs. Plastic Edging: Which is Right for You?] Remember to always prioritize safety and take your time to ensure a precise and long-lasting installation.
